If you’re interested in beginning your journey into Python SEO, one of the first projects you might be considering will be programmatically pulling data from Google Search Console or Google Analytics. You might also be looking for a way to push data into Google Sheets.
You’ll quickly learn that in order to do all of these things, you’ll need to create API credentials to securely push and pull data to and from the various Google sources.
This article is going to walk you through creating API credentials from the very beginning and you can follow along. We won’t be doing any programming at this time, so you can close your IDE down.
Creating a Project in Google Cloud
Everything to do with the Google API will live in the Google Cloud Platform.

After agreeing to the terms of service, you’ll click on the “Select a project” drop down at the top left.
When you click on that, it will pop up a module. If this is your first time ever visiting this, you probably won’t have any projects. There may be cases where you are a part of an organization already (eg: if your company uses Google Workspaces) and projects might exist in there. For the sake of this tutorial, we’ll assume we’re doing it all from scratch.
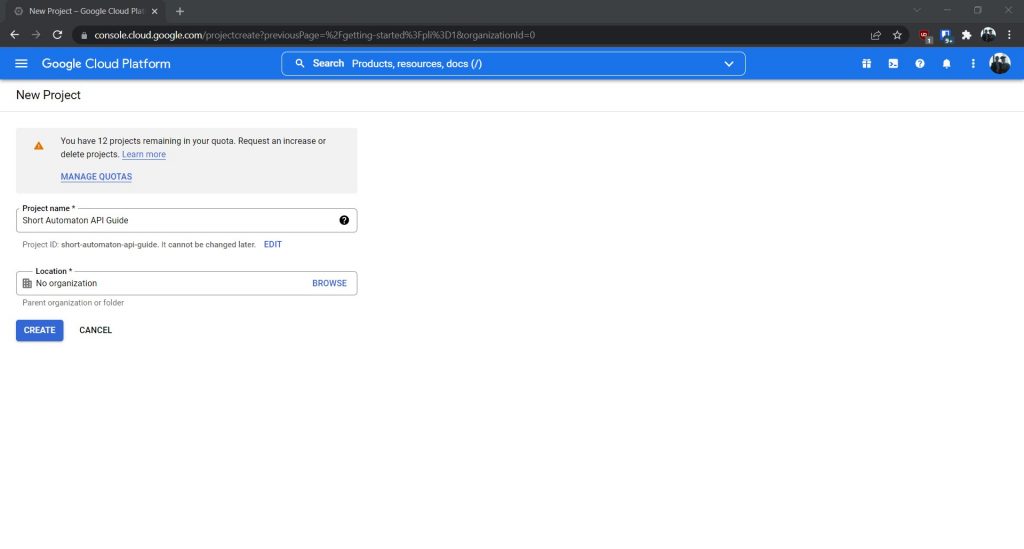
Within this module, at the top right, select New Project.

You can name the project whatever you want. When I started learning Python, it felt good to name my first project “Python SEO”.
Once you create the project, it will start to spin up and eventually take you back to the homepage. You’ll have a notification that the project has been created and you can enter the project.
Adding APIs to Your Project

This is your project dashboard. This is your home screen whenever you enter your project.
You might notice the billing tab in the left menu. For the purpose of this article as well as probably most of the content on this site, you shouldn’t have to worry about that. The APIs we use and the number of requests are generally low enough to be free. But it’s something to keep in mind if you ever get into a ton of API calls or using other premium Google products like BigQuery.
The first thing we’re going to do is enable APIs in our library. After that, we will add our credentials. So, just below billing, click on APIs & Services, then in the sub menu select Library.
We’re going to enable the Google Analytics API (for Universal Analytics), Google Analytics Data API (for Google Analytics 4), Google Search Console, Google Drive, and Google Sheets. You can add more later if you want. The process is exactly the same.

After you enable each API, it takes you to the management page for that API. To get back to the library to continue adding more APIs, click on the hamburger menu in the top left, go to APIs & Services > Library again.
Creating Google API Credentials
When you are finished adding all of the APIs to your project, head back to the menu. Instead of clicking on Library under APIs & Services, you’ll click on Credentials.
On this page, you’ll notice there are three options: API Keys, OAuth 2.0 Client IDs, and Service Accounts. I’ve never used a service account and it’s doubtful you will be using them at this stage in the game, so we’re not going to get into explaining those. The key difference between an API key and an OAuth Client ID, in layman’s terms, is that an API key is used to authenticate an individual request and OAuth credentials authenticate a user (by all means, if you’re reading this and disagree, please leave a comment explaining). For the most part, if not exclusively, you’ll be using OAuth for your programs.
Have you ever logged into a website with Google, Facebook, or Twitter? Those are OAuth authentications. That splash screen you see is called a Consent Screen – and that’s the first thing we need to create before we can get into creating credentials. There’s a nice big warning on this credentials page above the API Keys section that has a button to Configure Consent Screen; click that to get started.
Google OAuth Consent Screen

First we need to select the User Type. If you’re using a personal Gmail account, you only have one option – External. If your Google account is a part of a Google Workspace (formerly G Suite), you have the option to use Internal. I recommend an Internal user type if it is available to you. In this article, I’ll walk us through the External option.

You’ll need to fill out the information on the app registration screen. Only three fields are required: the app name, the user support email (this will likely be your own email), and the developer contact information (again, likely your own email). You can certainly add information to the other fields, especially if you have a swanky logo you want to add to feel more official. After you’re done, hit the Save & Continue button to move on to the Scopes.

Remember when we added the APIs from the library earlier? Those are what we’re adding as our scopes. Click on the Add or Remove Scopes button and a menu will pop in from the right. The available scopes are listed in a paginated list.
You’ll notice that almost all of these APIs have multiple scopes. They are designed for different levels of permissions. For example, you will see one like /auth/webmasters.readonly. If this scope is the one chosen, you won’t be able to write any requests into Google Search Console (like adding a sitemap). I select the base-level scope for all of these. You can see the scopes I chose in the screenshot above. When you’re done, you can Save & Continue below.
Step 3 is adding users to test this. Add yourself to this as well as anybody else on your team that would be using these credentials. There is a limit of 100 users prior to app verification during the lifetime of the app. Once that is done, Save & Continue and you’ll be taken to a summary page for your OAuth Credentials and from there back to the dashboard.
Your publishing status will be in testing and there is a button to publish the app. If you aren’t actually making a public-facing app, you will probably never have to deal with publishing the app.
You can click on Credentials in the hamburger menu at this point. It’s time to create the OAuth credentials.
Creating Google OAuth Credentials
At the top of the credentials page, click on Create Credentials, then click on OAuth client ID.

Since we’ll be using these credentials in Python, you’ll want to select the Desktop app in the Application type drop-down.
Give that bad boy a name and click Create.
Congratulations! You’ve created the credentials you’ll need to start your Python SEO journey! After you hit Create, you’ll be taken back to the main Credentials page with a confirmation pop-up that an OAuth client has been created. It will give you your client ID and client secret with the option to download JSON. Go ahead and download that and keep it in a safe place. We’ll be needing it to connect to Google Search Console.
Eric is a Python SEO with a passion for data. He uses Python to automate tasks and analyze large data sets. He is often the go-to for spreadsheet challenges, too. He sees every challenge as an opportunity to learn.


